
Deep Dive: Rigging and animating a quadruped (part 1)
A deep dive into using Unreal Engine’s animation tools to animate a four-legged friend in Springbound
Hey! I'm Bryce, a solo game developer and creator of Springbound. This is part of a series of deep dives exploring interesting aspects of the game and sharing lessons learned along the way.
Here’s the whole series if you’d like to read more: Springbound Devlogs
Animation breathes life into digital worlds and creates a connection between players and the characters they control. This leads to delightful moments when that interactivity produces magical and unexpected results!
I’ve learned that creating animations requires understanding how creatures move, master complicated tools, and find creative solutions to technical problems. Animation has always intimidated me, but I learned lots in the process of creating dynamic animations for critters in Springbound.
The big game engines like Unreal and Unity make it pretty easy to get started animating two-legged characters for games. They provide pre-built humanoid character rigs and even walking animations to get started quickly.
When I started developing the four-legged protagonist, I thought that adding two more legs would also be pretty straightforward—just copy and paste legs, right? The fundamentals are the same but animating four-legged creatures introduces some subtle technical complexity that took a while to figure out.
This post got long so I’m splitting it into two parts! In this part, I’ll cover some background and creating an animation rig using Unreal Engine’s Control Rig. The next part will cover authoring and playing back animations on the rig using Animation Blueprints.
Background: Spooky, scary skeletons 🦴
Before diving into the details, I wanted to quickly touch on how character animations (usually) work in games! Feel free to skip ahead if you’re a game dev and already know this stuff 🤓
Games use a technique called skeletal animation to efficiently animate characters moving around in 3D. To simplify: first, artists create the 3D visuals for a character (this is called the mesh) using digital sculpting and texturing tools. Then, they set up a skeleton inside the character mesh that controls how the character will move by carefully placing a hierarchy of bones which match the natural joints and movement points of the character. Just as a real skeleton determines how a body can move, a digital skeleton controls how a 3D character can be animated.
After a process called skinning that binds every part of the visual character mesh to this skeleton, the character is rigged and ready to animate!
When animators want to make the character walk or jump, they can simply move these bones around and the mesh will follow along naturally, just like a puppet. Each bone can be moved, rotated, or scaled, and the mesh “skin” follows along based on how much influence each bone has over different areas of the model.
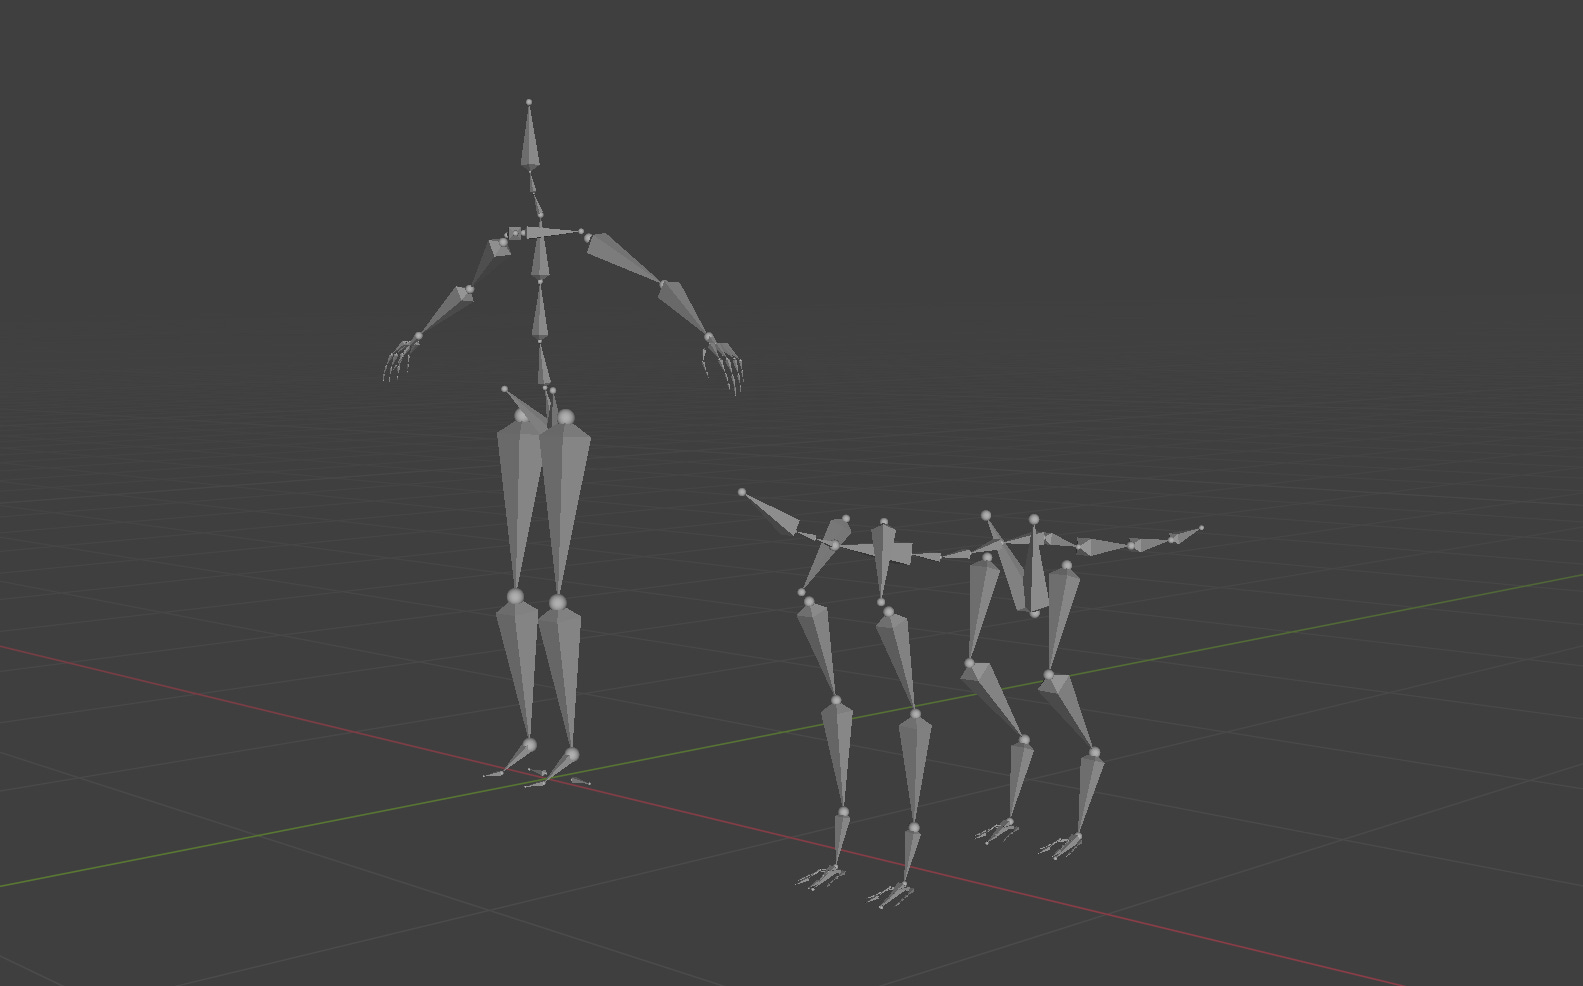
Here are how biped and quadruped skeletons are usually structured:
Creating believable animation really comes down to moving these bones around in a realistic way—which what we’ll be exploring in the rest of this post!
(Note: There are many more advanced animation techniques for finer details like facial expressions, physics simulation, muscle deformation, and more, but we’ll just focus on skeletal animation here)
Foot placement and staying balanced
Characters are typically created in a default standing pose on flat ground. But when you place characters on uneven terrain in a game, they’ll look unnatural if their legs don't adapt to the surface. We need to adjust the character’s stance based on the terrain underneath.
The first step is figuring out where to place each foot. We do a “foot trace”—casting a sphere the size of the foot that scans from above the foot’s resting point downward to detect the ground surface. When that sphere hits solid ground, we place the foot.
It’s important to measure not just the position but also the surface normal of the ground so that we can rotate the foot to align properly with the surface.


Without foot tracing, Finn is just floating there. With foot tracing on, he feels grounded into the environment (balancing between a sack and a rock) and it’s much more believable!
You can see a the foot tracing logic at work here. His front right foot is lifted up and placed against the sack and his front left foot is lower and on the edge of a rock. His back left foot is at a normal level and his back right foot is dangling in midair.
We can represent these offsets using effectors to track the final placement for each foot. Effectors are invisible controls that represent a position and orientation for a bone. Unreal’s Control Rig lets us set up controls visually and move them around to preview how the skeleton responds:
When a foot moves up or down in the real world, the rest of the body naturally makes subtle corrections to maintain balance as its center of gravity changes. When you take a step up the stairs, your legs bend, your pelvis moves upward, and your spine adjusts to maintain balance.
And these corrections lead us to the first subtle complexity of animating a quadruped: multiple chains of correction.
In bipeds, there is typically just one point that needs to adjust—the pelvis. Spine bones are stacked hierarchically under the pelvis, so movement naturally flows from the hips upward. This makes bipedal animation relatively straightforward since adjustments cascade up through a single chain.
But quadrupeds need have multiple points to correct—the pelvis and the shoulders shift independently as each leg moves up or down, but the position of the spine between the legs depends on the position of all 4 legs! This creates a more complex balancing act than with bipeds, since the body has to coordinate adjustments between front and back leg pairs.
Keeping this challenge in mind, let’s set up a few more effectors that control how the head responds to the environment and points of interest. Then we’ll combine everything into our final rig at the end!
Adding procedural gaze animation
Finn is written as a curious character. To emphasize this trait, I created a dynamic gaze system that brings his personality to life through procedural animation. The system identifies points of interest in his vicinity and makes Finn respond naturally by turning to look at each of them, showing his curiosity.
Gaze points of interest are determined by gameplay logic. The character uses Unreal’s AI Perception system to look for stimuli actors with an AISense_Sight config in the environment:

Every few seconds, the character queries for nearby stimuli within a field of view and prioritizes them using a scoring system. Other living critters get +10 points to ensure they attract focus. The remaining actors are sorted first by closeness, and then a random score is added for variation. This approach makes characters naturally glance between objects but maintain focus on other characters for eye contact.
Even though the gazing looks natural, it follows some fixed logic:
If currently sledding or sliding, the character looks in the direction of movement
If there are nearby stimuli, look at that actor
If there is no target in sight, then choose a random point within a gaze box in front of the character to look at:
If you look carefully, you'll see a small yellow dot moving around in the gaze box every few seconds—just like that little dot in the peripheral vision test at your last eye appointment 😅
Now let’s look at the actual logic in the animation rig to make Finn turn and face each target. We’ll set up new controls for the head!
Head effector
First, we calculate the direction from his head to the gaze target and clamp it within a cone to prevent the head from over-rotating. Then, adjust the effector position by gradually moving it from his head’s current position toward facing the target with controlled speed and smooth easing. We can also add a slight forward lean by offsetting his head in the gaze direction—this small detail makes Finn look much more interested in the target!Eyes
After moving the head towards the target, we can calculate the direction that the eyes should look. This is also clamped inside a cone to prevent the eyes from rolling back into their sockets 😵💫Ears
For one last bit of polish, we can add secondary animation to the ears to make them bounce and add some cartoony life when Finn’s head turns or he moves. We simulate the ears like springs using Control Rig’s Spring Interpolate node to apply physics simulation to each ear bone every frame.
(Note: The eye and ear animation technically happens after the full IK pass we’ll cover below, but it fits well in this section 😛)
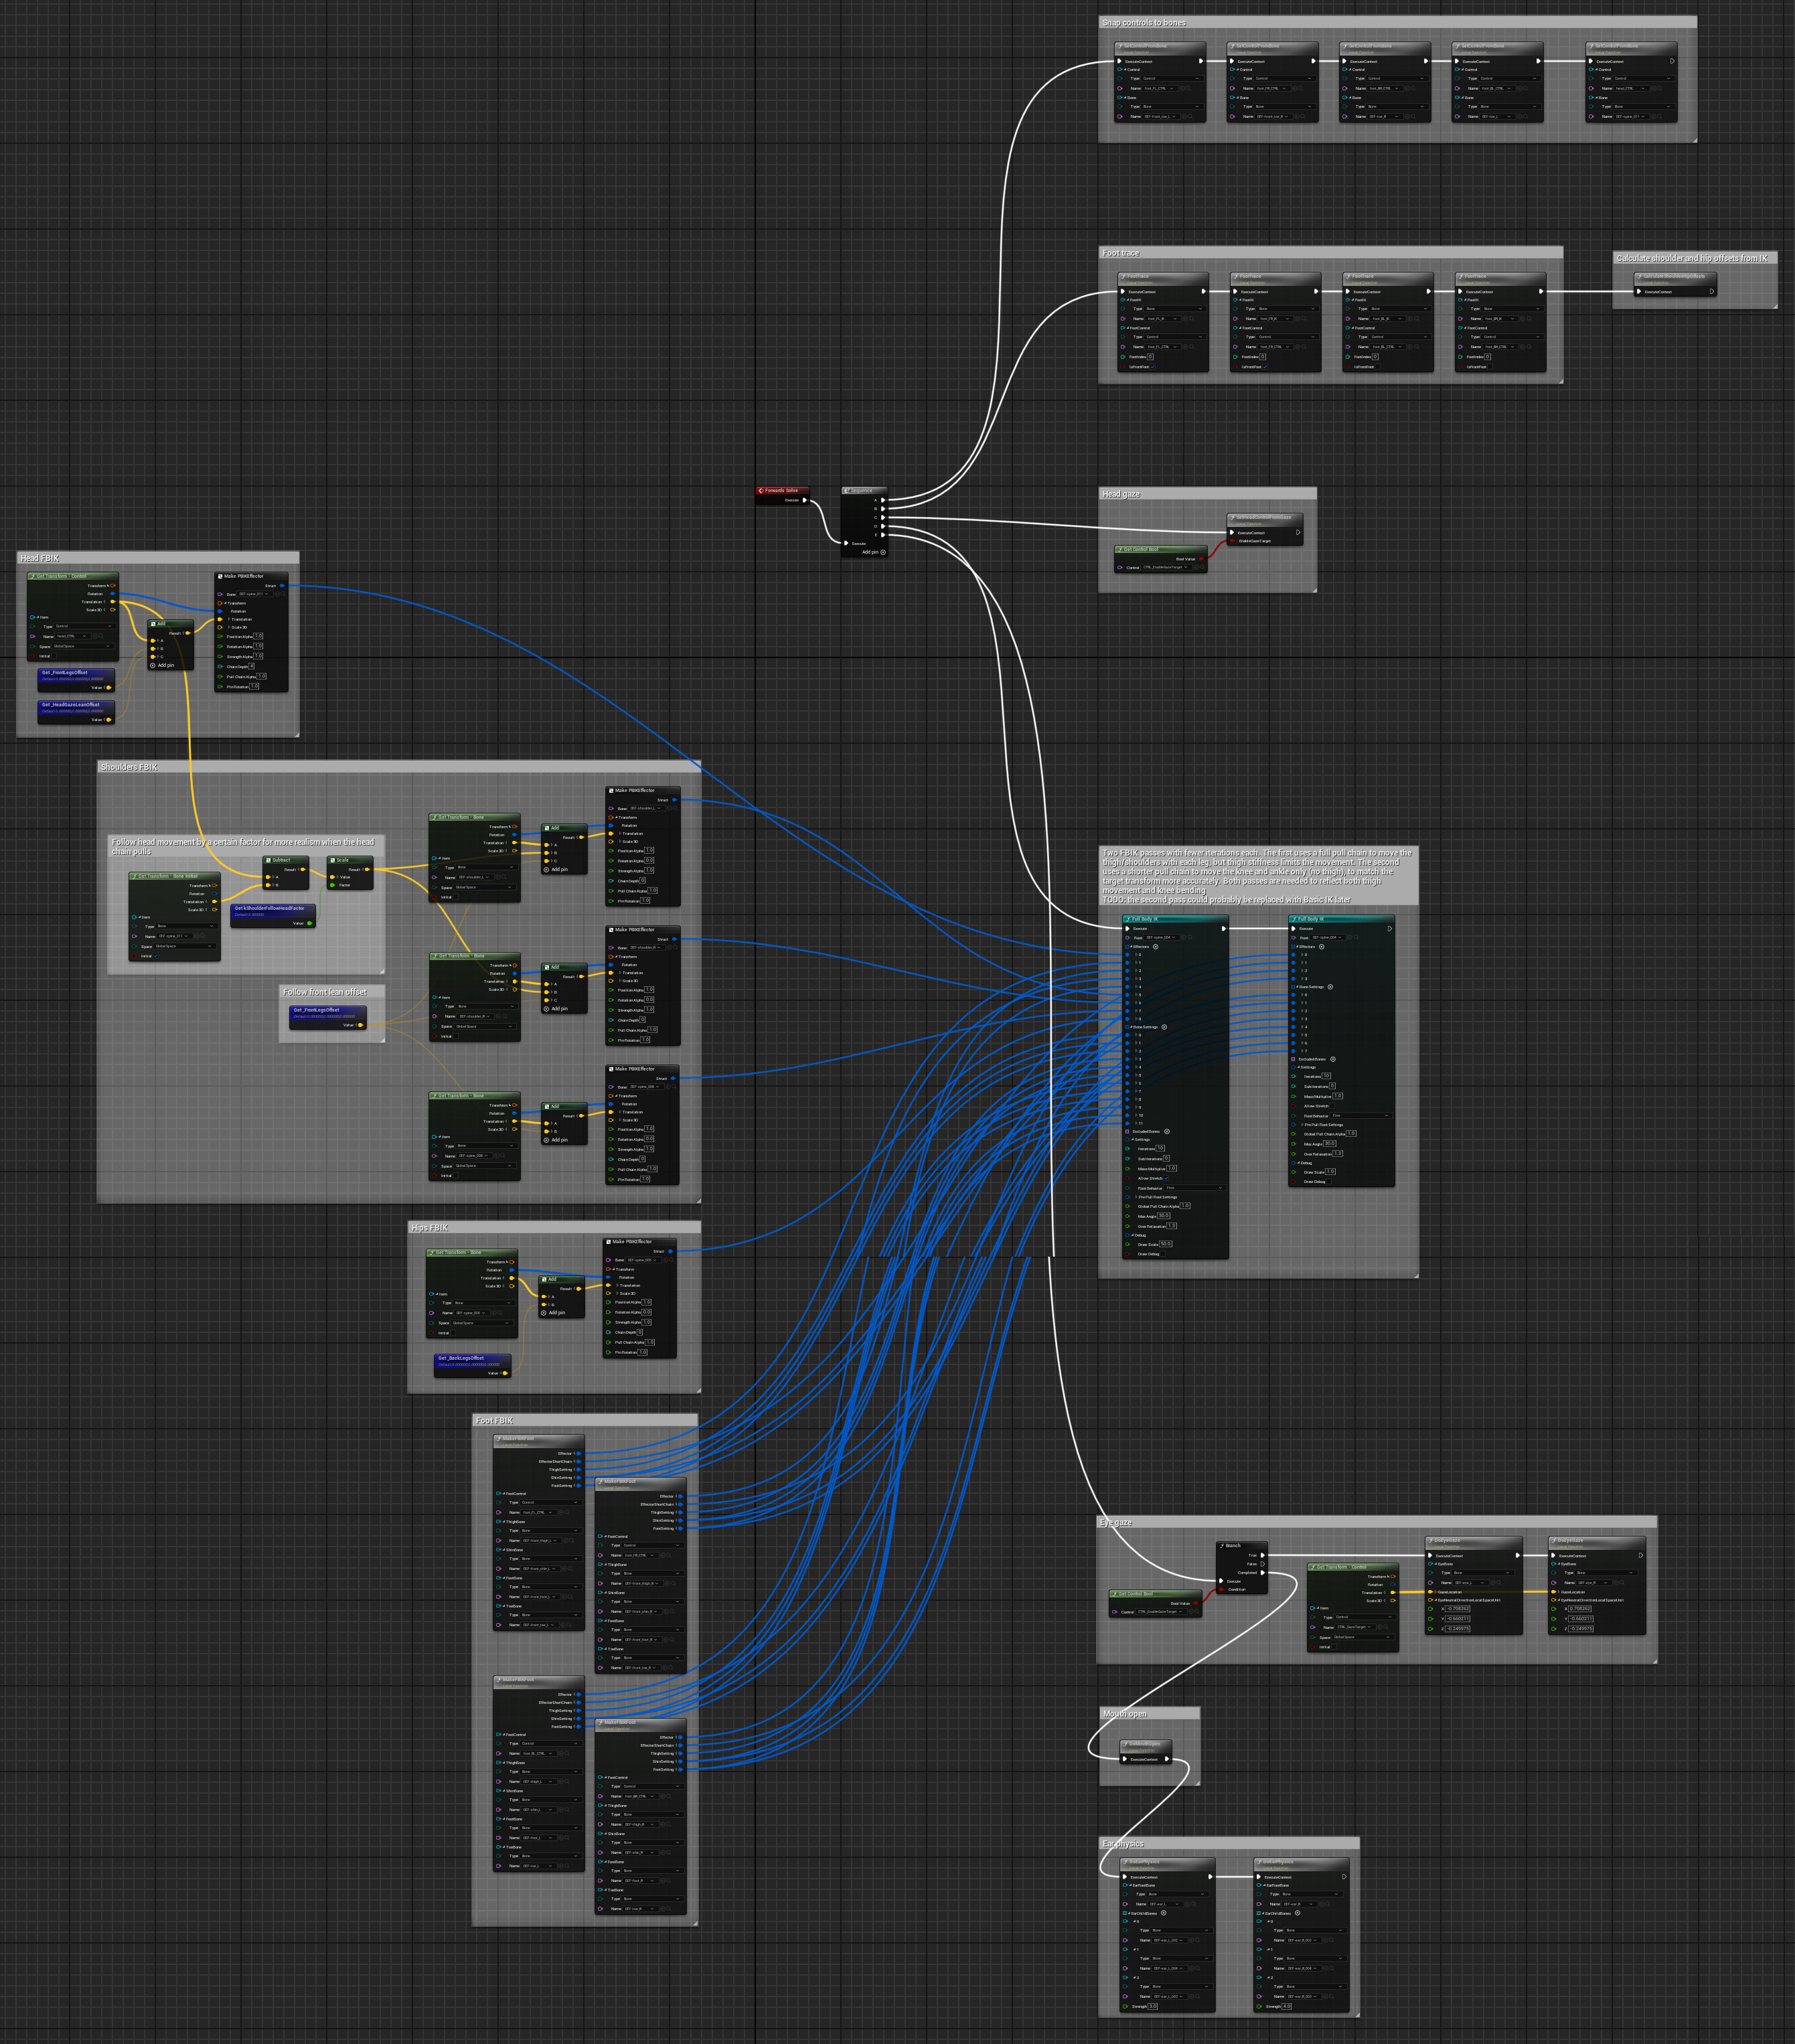
Now that we have all of these effectors set up, we can combine everything into a unified rig!
A four-legged, full-body IK setup
Inverse kinematics (IK) is an animation technique that lets animators specify where they want end of a limb to be placed (like a foot touching the ground) and an algorithm figures out how to rotate the joints to achieve that end position. It’s used in character animation to calculate how a character’s skeletal rig should move from its starting pose to reach each new animated pose.
Basic IK is set up on discrete bone chains in a rig, like on every arm and leg. Each IK chain is independent and only influences the bones within its own chain, not those outside it. This offers precise control, but adjustments for realism requires lots of manual work since each part is solved independently. With quadrupeds, we need to consider how multiple IK chains interact with each other, especially between the front and back leg pairs. The shoulder and pelvis areas need their own IK controls to properly coordinate movement between all four legs.
Full-body IK (FBIK) is a more advanced IK solver that is perfect for our use case. It allows us to set up “effectors” that act as magnets which pull on bones to guide the skeleton into a desired position, while preserving anatomically correct body proportions and joint limits. You can pull on one part of the body and the rest follows along because the solver operates on the whole skeleton. It’s very procedural and flexible!
FBIK solves many of the coordination challenges between front and back legs that we discussed earlier, since the system will automatically solve the corrections between different parts of the body! And Unreal has a Full-Body IK plugin which integrates with Control Rig.
(Note: Unity doesn’t have FBIK built in, but I’ve used the fantastic 3rd party package Final IK for this instead)
Here is Finn’s skeleton:

Here’s the full list of effectors to pass to FBIK:
Four foot effectors (one for each foot)
Placed at and oriented to the ground using the foot trace we created earlierLeft and right shoulder effectors
Moved up based on the shoulder offset: an eased average of the front foot offsets Partially following the head offsets to create a forward leaningHead effector
Aimed and offset toward a gaze target as described earlier Also moved up based on the shoulder offsetHip effector
Moved up based on the hip offset: an eased average of the back foot offsetsCenter spine effector
Moved up based on an average of shoulder and hip offsets
FBIK also takes settings for each bone, including stiffness (how much it resists rotation) and angular constraints (elbows and knees can only bend in one direction).
The legs didn’t bend as much as I wanted and they would lock when Finn leaned. After lots of experimentation, I solved this with two changes:
Adding thigh stiffness to encourage knees to bend
Running two FBIK passes. The first pass uses a full pull chain to move the shoulders and hips with each leg, but thigh stiffness limits the movement. The second pass uses a shorter pull chain (moving only the knee and ankle, not the thigh) to match the target position more precisely. This two-pass approach encourages both thigh movement and knee bending.
Bringing it all together
Here’s what the full control rig looks like under the hood:
Now let's see the character rig in action! Watch how Finn and Pip gaze at each other and the objects around them:
Thanks for reading! We explored how foot placement, gaze targeting, and subtle adjustments work together to bring Finn’s personality to life through animation. We started with a base pose, set up effector targets in Control Rig to ground Finn in his environment, and implemented FBIK for realistic quadruped movement.

In part 2, we’ll explore how this rig combines with walking, sliding, and sledding animations to create lifelike movement. Stay tuned…